


, on Linux")
Getting started with Meshnet (cjdns), on Linux
, on Linux")
This guide is for people who want to connect to Meshnet (cjdns) but have enough knowledge to play with Linux commands on daily basis. The users who are not scared to open command line terminal and execute the commands mentioned in this guide, and are able to edit/save text/configuration files through command line, using tools like nano. If you are yet not that level of user, but still want to give it a try, I’ll try my self to keep it as simple and precise as possible. And will also try to update this guide with future suggestions by users.
As these days Ubuntu is known as one of the most popular Linux distribution, this guide supports Ubuntu Linux initially. And Ubuntu is Debian based, so you can try the same script for other Linux distributions which are also based on Debian.
Here’s a nice video explaining what is Meshnet and a little about cjdns:
https://www.youtube.com/watch?v=1tEkyLOh-tY
I’ll have cjdns covered in another article with bit more clear information also comparing it with other Meshnet solutions out there.
I’ll add support of Redhat based distros like CentOS/Fedora/Redhat soon, and update this article with updated commands/links. So, if you are not using Debian based Linux, check back this article again in few days maybe and you’ll find some updated instructions here.
Update 28 Oct, 2015: CentOS/Redhat Support Added to installer script
Please note that this guide is using custom shell script, which is a automating the sequence of compiling and installing cjdns on Linux machine. I’ll have another guide written with little advanced instructions to setup cjdns manually, for which cjdns community can be approched for help. But, if you face any issue with this auto install script, please don’t hesitate to contact me here or on forum.meshbits.io
Let’s get started with the short version of the guide, and then later we can get to a bit detailed version in another article using which you may install cjdns on other variants of Linux distributions, if you have enough knowledge to install required dependency software on those Linux distros.
In this guide, I’ll be using my custom shell script to install cjdns with easy instructions. You can find and read the shell scripts here if you wish to analyse the scripts.
Step 1: Open Command Line Terminal
This guide assume you already have Debian based Linux installed (example: Ubuntu 14.04/15.04).
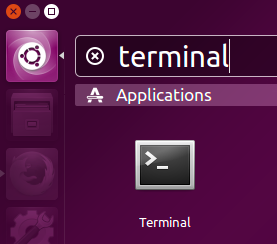 As per screen shot you’ll find a button with Ubuntu logo at left hand side of your Ubuntu machine. If you click on that button you will find a text box where you can type some text keywords to find the application you are looking for.
In that text field, you’ll write terminal.
Then click on the Terminal application as shown in screenshot to open Terminal window.
To open Terminal on CentOS/Redhat go to Applicaions -> Utilities -> Terminal.
Step 2: Execute this long single line command
Now that you have opened command line terminal you’ll just need to copy the following long single line command and then paste it in terminal window.
sudo wget -c https://gist.githubusercontent.com/satindergrewal/1b8310e9a4a68183385c/raw/369ec444ab26b31552c4e5d10d2906c4214232fd/hyperboria.sh -O /etc/init.d/hyperboria && sudo chmod +x /etc/init.d/hyperboria && sudo /etc/init.d/hyperboria install
To paste this long command to terminal go to terminal window and right click anywhere on that terminal window and select paste option from menu. As shown in the following screenshot:
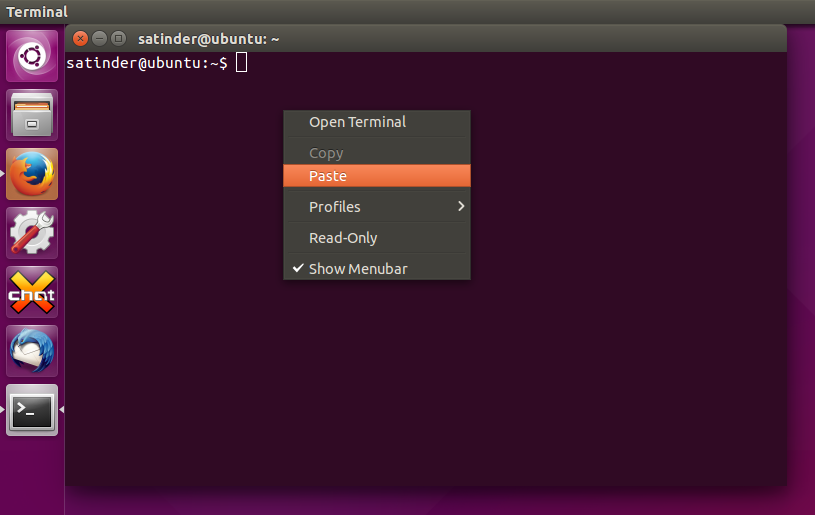
Once you have the command pasted in terminal window, hit Enter key on your keyboard and you might be prompted to enter your login password. The password you use to login to your Ubuntu machine.
If you are on CentOS or Redhat, you probably have to login as root in Terminal. Use command su and then execute this long single line command.

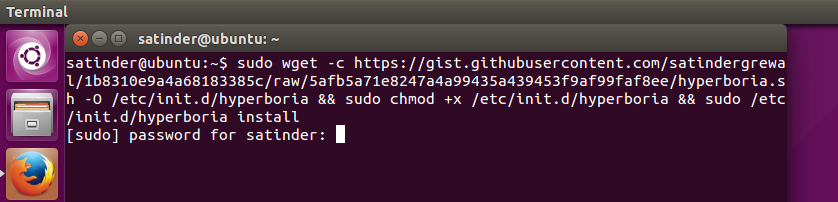
Don’t use the command showing in screenshot. It’s outdated. Updated command is in article’s Step 2.
After this step you just sit back and wait for the whole process to finish. This process will download the installer script on your system, update and install required dependency applications/library files, will clone the cjdns files from githhub, compile it for you, generate a cjdns configuration file at /etc/cjdroute.conf and add a public peer to that configuration file.
This same script will also add cjdns as a system service so that every time you reboot or start your system cjdns gets started automatically.
At the end you’ll see message like the following screenshot:
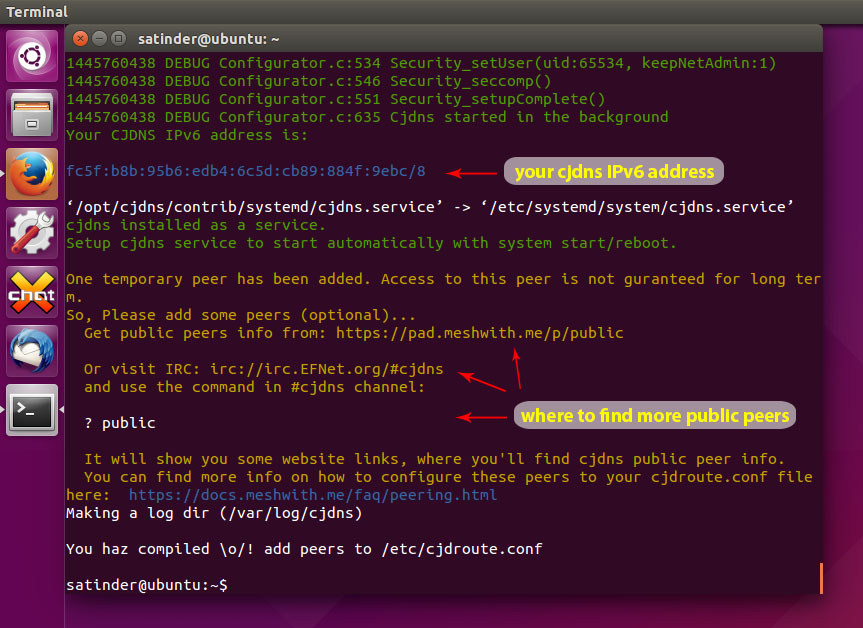
With this installer script you get one public peer automatically setup in your /etc/cjdroute.conf file. But that public peer will not be active forever. You have to find more peers and add them to your cjdns configuration file. You can find some information on finding peers at the end of installation script as you see it in the screenshot above. You can also follow this guide to find more detailed information about finding and connecting to cjdns peers here.
Step 3: Check your connectivity to Hyperboria
Now let’s check if you have access to any of the websites ONLY available over cjdns meshnet’s largest network called Hyperboria. Hyperboria, which is the global network of small mesh networks spread around world.
First to check is if you have established connection to any peer configured in your cjdns configuration file (/etc/cjdroute.conf) file. For that execute peerStats command in Terminal, as shown in screen shot below:

If you see any of the peer showing ESTABLISHED, means you are connected to cjdns network, and probably to Hyperboria network as well, through that connected peer.
Now, to check if you can access any Hyperboria Only websites (like socialno.de, irc.cjdna.ca, forum.meshbits.io) just ping to any of these websites, and see if you are getting response. The command to ping a Hyperboria website is:
ping6 socialno.de
or
ping6 irc.cjdns.ca
or
ping6 forum.meshbits.io
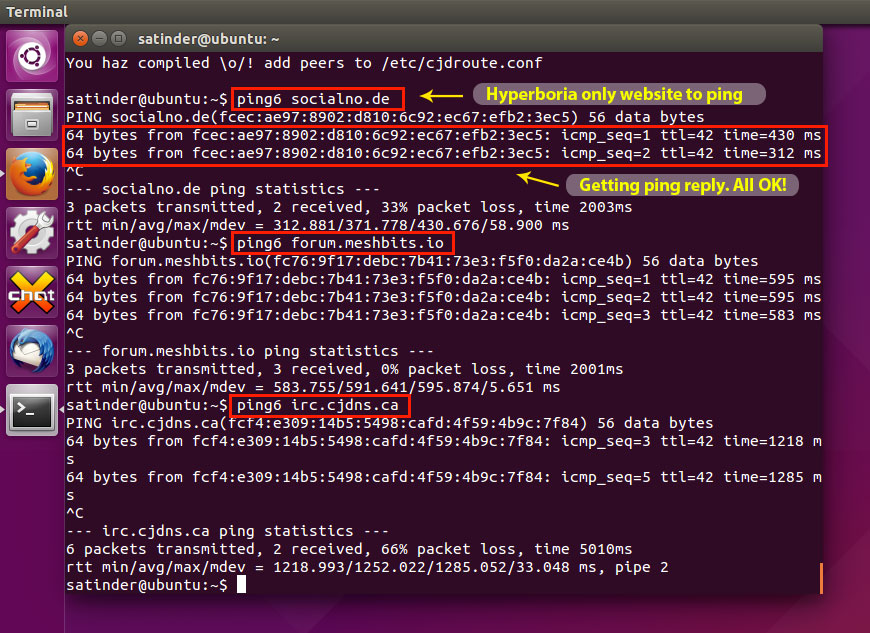
If you see the final result as above screen shot, CONGRATULATIONS! You are now connected to cjdns’s largest network called Hyperboria.
Now you can visit some Hyperboria only websites like
http://socialno.de
http://forum.meshbits.io
http://hyperboria.name
https://rows.io
Join other hyperboria users on irc chat and say hello at irc://irc.cjdns.ca/#cjdns
More information on this installer script
You can see more options to this shell script by executing this command in terminal:

To stop cjdns service you can use either of these commands:
sudo /etc/init.d/hyperboria stop
sudo systemctl stop cjdns
To disable starting cjdns at the system start/reboot use the following command:
sudo systemctl disable cjdns
To update cjdns installation use the following command:
sudo /etc/init.d/hyperboria update
To delete cjdns installation from system use the following command:
sudo /etc/init.d/hyperboria delete
Hope this guide is helpful for your to install and join Hyperboria network.